Teaching light, heat, and sound energy in 2nd grade doesn’t have to feel overwhelming. In fact, it can be fun and engaging for your students! With a few simple materials and some hands-on experiments, your students will see, hear, and feel energy in action.
In this post, I’ll share ways to teach light, heat, and sound energy with lessons that are easy to set up, kid-friendly, and aligned with TEKS 2.6A (investigating the effects of increasing or decreasing light, heat, and sound energy).
Table of Contents
1. Light Energy Lessons

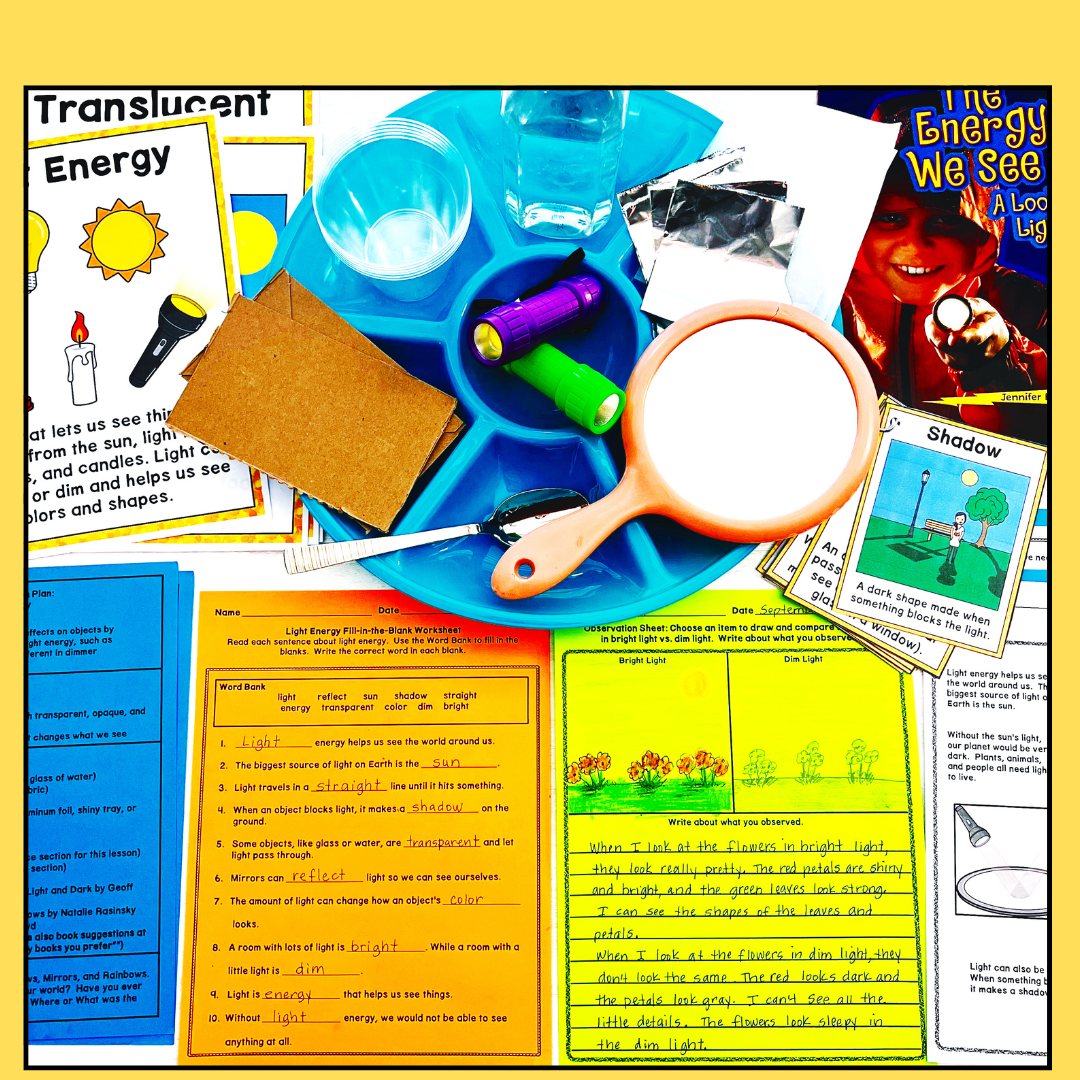
Light is something students see every day, making it an easy concept to explore.
Ways to Teach Light Energy:
- Flashlight Test: Give students flashlights and objects like mirrors, foil, or colored paper. Shine the light to see which materials reflect or block light.
- Shadows Exploration: Have students make shadows with their hands or toys. Ask them how the shadow changes when the light source moves.
- Bright vs. Dim Light: Compare how colors look in bright light versus dim light using classroom objects or colored paper.
Why it Matters: Students learn that light travels in straight lines, can be reflected or blocked, and affects how objects appear-important foundational knowledge for understanding vision, technology, and the environment.
2. Heat Energy Lessons

Heat energy is easy for students to relate to because they experience it every day: in sunlight, warm food, or even their own bodies.
Ways to Teach Heat Energy
- Ice Cube Investigation: Give each student an ice cube in a bag. Have them hold it and observe how it melts from the heat of their hands.
- Material Heating Test: Place metal, plastic, and wooden spoons in warm water. Students compare which heats faster and record observations.
- Melting Food Experiment: Optional: observe chocolate or butter melting under safe, warm condition (sunlight or lamp).
- Solar Oven: Create a solar oven to cook s’mores!

Why It Matters: Students learn that heat energy can change matter, and different materials heat at different rates. This builds understanding of everyday phenomena like cooking, weather, and energy transfer.
3. Sound Energy Lessons

Sound energy is engaging because students can see, hear, and create it themselves.
Ways to Teach Sound Energy:
- Vibrating Rubber Bands: Stretch rubber bands over boxes to make mini guitars.” Pluck the bands to observe vibrations producing sound.
- Cup-and-String Telephones: Students use cups and string to explore how sound travels through solids.
- Loud vs. Soft Sounds: Students clap, tap, or shake instruments softly and loudly, noticing volume differences.
- High vs. Low Sounds: Compare high pitches sounds (birds, triangles) to low-;itched sounds (dog barks, drums).
Why It Matters: Students discover that sound comes from vibrations, can vary in pitch and volume, and travels through air, solids, and liquids–essential knowledge for understanding communication, music, and safety signals.
Bringing It All Together

After exploring all three energy types, reinforce learning:
- Create a class anchor chart summarizing light, heat, and sound energy.
- Have students make a mini booklet with pages for each type of energy, drawing and recording observations.
- Ask reflection questions like: “What happens to ice when it gets warm?” or “Why does sound get quieter the farther away you are?”
Why These Lessons Work:
- Hands-On: Students see, feel, and hear energy in real life.
- Simple Materials: Ice, flashlights, spoons, rubber bands, and cups are all found easily.
- TEKS-Aligned: Perfect for 2nd grade TEKS 2.6A science standards (these activities can be used in conjunction with ANY science curriculum).
- Memorable: Students retain knowledge because they actively explore concepts rather than just read about them.
- BONUS: Reading TEKS incorporated through reading passages with comprehension questions and vocabulary matching activities. The reading passages may also be used as a review or a quiz!
Final Thoughts
Teaching light, heat, and sound energy in 2nd grade is a chance to help students understand how energy shapes the world around them. Keeping lessons hands-on ensures your students are engaged, learning, and having fun–all while building essential science skills.
By making energy tangible and relatable, you’re not just teaching science, you’re giving your students tools to observe, think critically, explore, and be scientists!
Hands-On Science Fun for the Whole School Year


0